I'd like to think I'm creative, but I'd find it hard to keep a straight face calling myself artistic - which is what lead me to this post. I've been looking for some cool DIY projects to transform the white walls of our home recently, and I wanted to make something that resembled the below...
Can't be too hard, right? Well, over the weekend I took my second ever art class at The Drawing Room in Christchurch and had the best time!
For those of you that haven't already heard of it, Pouring Medium in its most basic form is essentially an acrylic liquid that sets dry with a slightly glossy finish. You mix it with acrylic inks to make your colours and once you throw it on your surface, it's mixed around to create somewhat of a marbling effect. There are plenty of techniques to learn, but lets start at the beginners level.
You'll need to excuse my lack of photos, I got so caught up in the moment and forgot to take them at each step.
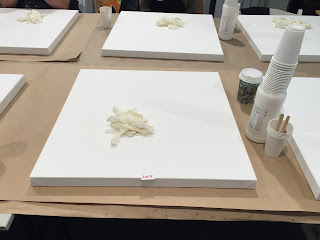
First up, here was our blank canvas. We had a pair of gloves, eight plastic cups (two in each corner) to sit the canvas on, a bottle of Liquitex Pouring Medium between two people, another five plastic cups to mix our colours and five popsicle sticks to use as our mixing utensils.
Next, we picked our colours. Below are the ones I have since purchased from The Drawing Room, but for this piece I used a pearlescent pink, cool grey, metallic copper, blue and white inks. If you are considering using similar colours it's important to note that the metallic and pearlescent hues aren't going to show up as opaque as regular colours, so have a play around first and see how they all react together. Oh, and a tiny splash of black goes such a long way!
Once our colours were chosen, we poured the medium into our cups, one per colour. For a canvas our size (24 x 24in) we used half a bottle of medium. I put a couple of squeezes (give or take) of ink into each cup, then took my popsicle sticks and mixed the colour through evenly. Then we poured! Not knowing any techniques, we just poured randomly, popping colour wherever we kind of thought we wanted to place it. I forgot to take pictures at this step, but here is one from The Mindful Artist for you to get an idea...
Now for the fun part. We picked up our canvas' and tilted them in all directions so the medium started moving all around the place. To stop wastage in the class, we couldn't go over the edges but I totally will for my next piece! You have about 10-15 minutes to work with the medium before it starts to set, so keep that in mind, and be aware of knowing when to stop as it's so easy to get carried away - therapeutic almost! I put mine down for a couple of minutes, then started moving it again which caused a few stretch marks once it dried, you'll be able to see in the dried image further down. If you want to see how this piece of the process is done, check out @lundstrompaintings on Instagram.
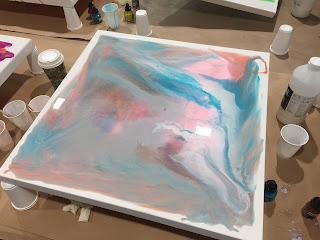
Here is my wet canvas...
To allow the medium to dry, we left our work at The Drawing Room overnight to dry. See below - and see how different it is to when I left it the day before?! Part of this is due to the stretching which I wasn't too happy with but it's all a learning experience!
The last three days, I've had my canvas sitting flat on a desk, to ensure it's completely dry before hanging. Tip - if it feels damp on the underside, do not hang it until it's dry. It may feel dry on top, but wet colour underneath can still slide. It's not quite what I envisaged, but hey - I'll just commission it once I'm famous!
I just love the marble trend, and even more so, monotone colours. For my next project I'll be replicating something like this, what do you think?
Let me know if you get around to trying this, or anything similar. I'd love to know what you did, how you did it and better yet - how it turned out!


No comments:
Post a Comment